When people order a custom scrim or backdrop, almost all of the conversation goes into the fabric and the artwork. The finish, meaning how the panel is built to hang at the top and weighted at the bottom, gets decided in the last thirty seconds of the order, and that is exactly where hangs go wrong. A sharkstooth scrim that will not lie flat, a printed backdrop that ripples under a wash of light, or a drop that does not fit the pipe you own are almost always finishing problems, not fabric problems. Here is how to specify both ends so the panel arrives ready to fly on the rig you actually have.
Top finishes: how the panel meets the pipe
The top edge can be built four common ways, and the right one depends on your rigging. A sewn pipe pocket is a sleeve along the top that you slide a pipe or batten through; it distributes tension evenly and is the cleanest look for scrims and cycs, but it requires threading a pipe the full width. Webbing with grommets puts a reinforced band across the top with metal grommets, standard in the U.S. at 12 inches on center (European houses often use 8 inches, or 20 cm), so you can tie or S-hook the drop to a pipe grommet by grommet. Tie lines replace grommets with sewn cotton ties for a quieter, all-fabric attachment, and snaps on 12-inch centers let you attach to a snap tape or adjust the hang height. If you are not sure, webbing with grommets on 12-inch centers is the most forgiving and works with nearly any pipe.
Flat or full: why a scrim is different from a leg
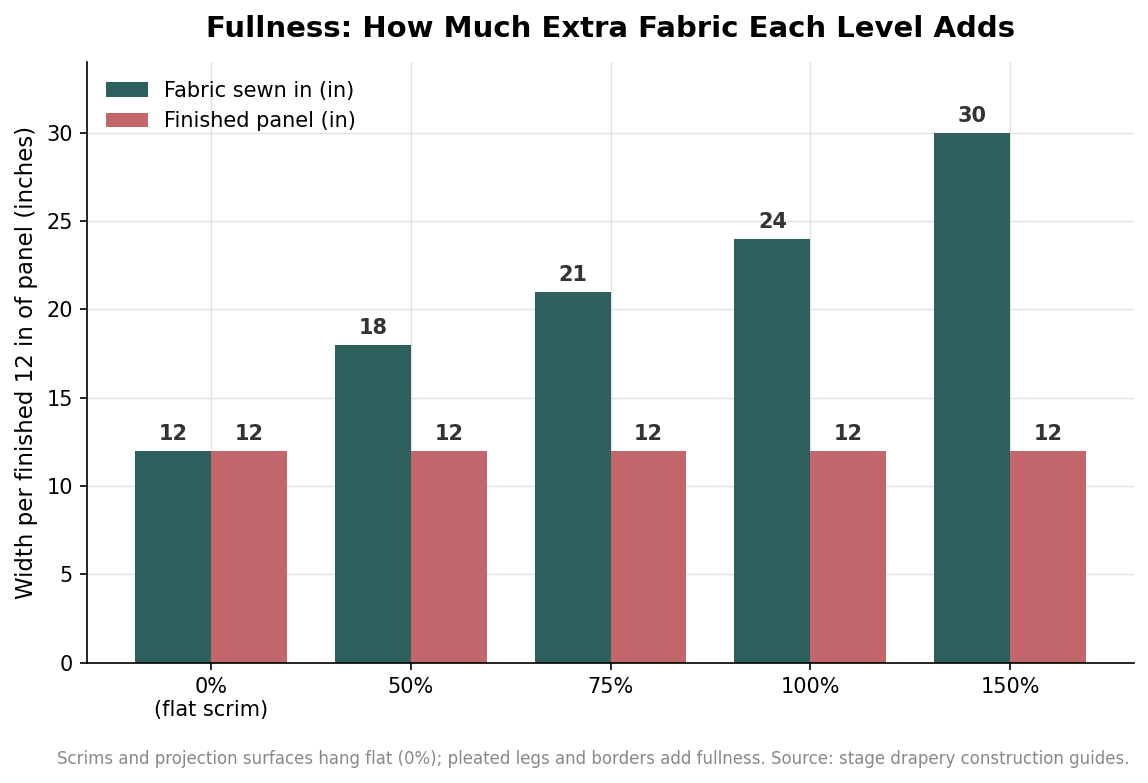
Fullness is the amount of extra fabric sewn in so a drape gathers into folds, and it is the single biggest divider between panel types. A scrim, a cyclorama, or any surface you will light evenly or project onto is built flat, at 0 percent fullness, because folds cast shadows and break up an image. Decorative masking, on the other hand, wants body: legs and borders are commonly made at 50 to 100 percent fullness so they read as rich, opaque drapery rather than a taped-up sheet.
The math is worth understanding before you order, because fullness multiplies both fabric cost and weight. At 50 percent fullness, 18 inches of fabric pleats down to 12 inches of finished width; at 100 percent, it takes 24 inches to make the same 12; at 150 percent, 30 inches. Order fullness on a scrim by mistake and you have paid extra for a surface that now hangs in shadow-throwing waves.
Bottom finishes: what keeps it taut
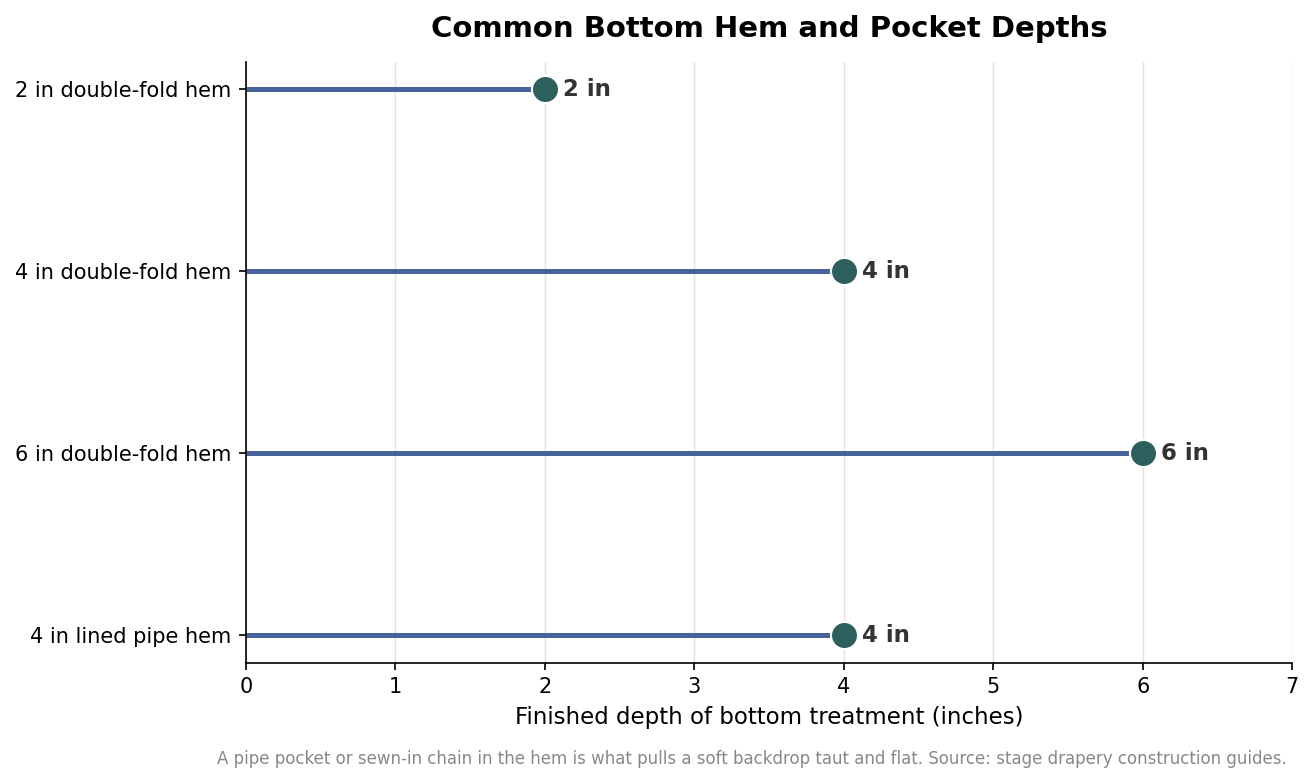
The bottom edge is what pulls the wrinkles out and holds the panel vertical, and it is where scrims are especially demanding because the sharkstooth reveal only works if the fabric is drum-tight. The simplest option is a double-folded hem in 2, 4, or 6 inches, which finishes the edge but adds little weight on its own. For a surface that must hang flat, a pipe pocket at the bottom lets you insert a length of pipe whose weight tensions the whole drop; a 4-inch lined pipe hem is a common spec, and the pocket is sewn to slip over the outside diameter of the pipe you plan to use, so tell the maker that dimension. Where a rigid pipe is impractical to ship or store, a sewn-in chain in the hem does the same job with weight that folds into a hamper, which is why touring drops so often use it. Chain also lets a drop puddle or trim to an uneven deck without kinking, whereas a pipe holds a hard straight line that shows every dip in the floor. For a sharkstooth scrim, the practical test is simple: if you can see any slack or scallop across the bottom once it is hung, the reveal will look muddy, so err toward more weight rather than less.
Match the finish to the rig you already own
The most common ordering mistake is speccing a finish for an ideal rig instead of the one in the room. If your batten is a fixed pipe with limited access, a top pipe pocket means threading the entire width every time, which is slow; grommets and ties go up faster. If you fly the drop in and out and store it in a road case, a bottom chain beats a bottom pipe you have to remove for every move. If the panel is a projection or lighting surface, insist on 0 percent fullness top to bottom and a weighted bottom so the image stays flat. Measure the finished dimension you need first, then add the top finish allowance, because a grommet band or pipe pocket consumes an inch or two of height that can otherwise leave you short at the deck.
Specifying it cleanly
State the finish as a top treatment, a fullness percentage, and a bottom treatment in one line: for example, webbing and grommets on 12-inch centers, 0 percent fullness, with a 4-inch bottom pipe pocket sized for 1.5-inch pipe. Add the tie or S-hook count if you want them supplied, and confirm whether the quoted size is the finished dimension or the cut size, since the two differ by the hem and top allowance. Getting these details on the order is what separates a backdrop that flies in and looks right on the first cue from one that fights you all through tech. When the panel is a scrim or cyc that has to disappear or fill with light, treat the finish as part of the optical spec, not an afterthought.